Maximize your cloud storage with these 5 tools and tricks
It’s the same thing every vacation: The photo collection grows and grows and grows, with dozens of photos being added every day. The easiest way to back up your photos is via cloud storage; you can then store them in Apple’s iCloud, on Google Drive, Microsoft OneDrive or in the online storage of a third-party provider.
However, this is only a temporary solution, because after your vacation you should review the pictures on your home PC, sort out duplicates and unsuccessful ones, and edit the others if necessary. If you only have the limited data quota of free storage available, you will have to move files saved online to your PC from time to time anyway and archive them there.
Further reading: Google Drive storage still full after deleting files? Here’s why
When moving and deleting files in the cloud, you can utilize the synchronization folder that these cloud storage services create in Windows. The synchronization folder lives on the local PC hard drive is integrated as a separate directory in Explorer.
All actions that you perform on the files there are also automatically performed on the cloud storage. So if you delete a file in the local synchronization folder, it will also be deleted in the cloud. The local version ends up in the Windows recycle bin, the cloud copy in the cloud storage recycle bin.
Select and delete files that are no longer required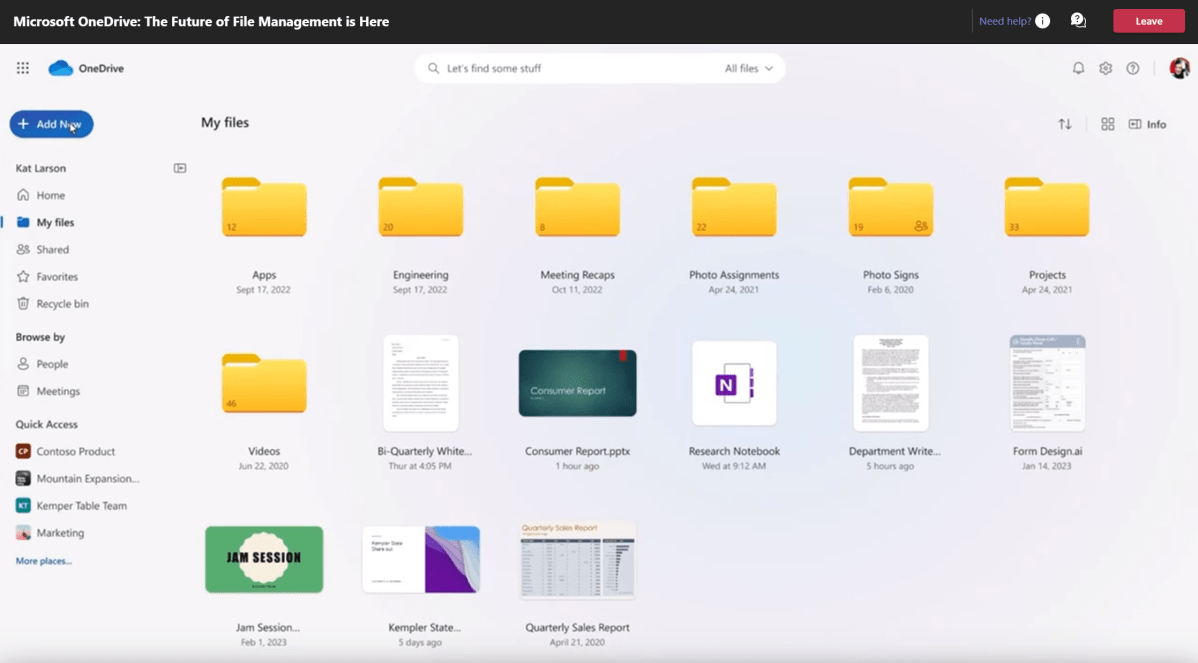
You can organize your cloud files in Explorer or in the browser by creation date and then go through them to electively delete files that are no longer required.

You can organize your cloud files in Explorer or in the browser by creation date and then go through them to electively delete files that are no longer required.
Mark Hachman / IDG

You can organize your cloud files in Explorer or in the browser by creation date and then go through them to electively delete files that are no longer required.
Mark Hachman / IDG
Mark Hachman / IDG
The safest way to select and delete unnecessary files is to call them up and view them individually. However, this is simply illusory when there are often several thousand files in the cloud, so you have to proceed systematically, for example by sorting the files by date. To do this, open your cloud storage and click on the column header which, depending on the cloud service, may be labelled “Recording date” or simply “Date.”
Place the oldest files at the top and check from top to bottom which files you want to keep, which can be deleted, and which should only be backed up locally.
In the same way, you can also filter out the biggest space hogs, such as recorded videos.
Another space hog is the shares of other cloud users that are synchronized with your account. In this way, the files from other online storages are added to your storage quota. If you stop accessing these shares, your available free storage space will suddenly increase.
OneDrive: Back up all cloud content to your PC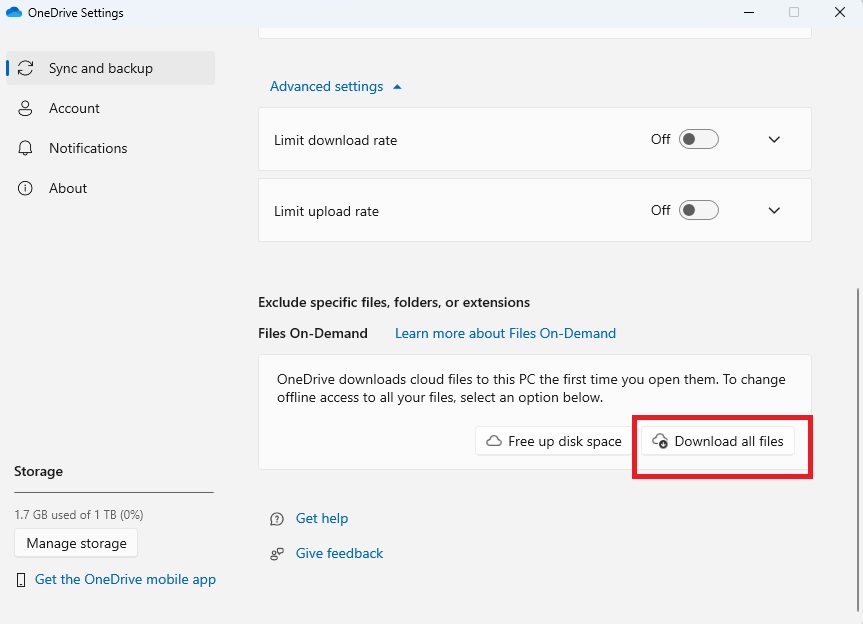
You can use the OneDrive Windows program to download all files from the cloud service to your computer’s local hard drive in one go.
You can use the OneDrive Windows program to download all files from the cloud service to your computer’s local hard drive in one go.
Foundry
You can use the OneDrive Windows program to download all files from the cloud service to your computer’s local hard drive in one go.
Foundry
Foundry
If you use Microsoft OneDrive, you can back up all existing online content to your computer with just a few clicks. To do this, open the OneDrive app and right-click on the cloud icon at the bottom of the taskbar. In the following window, click on the gear icon, then on “Settings.”
Go to “Sync and backup,” scroll down and click on the “Advanced settings” link. Scroll down again and click on the “Download all files” button. After you have confirmed the warning message with “Continue,” OneDrive will copy all content on the local hard drive to a directory of your choice.
Further reading: 9 must-know Microsoft OneDrive tips: Get more from Windows cloud storage
You can then delete the original files on OneDrive. To do this, open the OneDrive synchronization folder on your PC in Explorer, select the files and folders, and move them to the recycle bin. This action is now automatically repeated in the cloud storage.
You can also automate this task and regularly delete files both on the local computer and in the cloud according to a schedule. However, be aware of the associated risk: If you have not backed up the cloud files elsewhere beforehand, any files you still need will also disappear in this way — that’s how synchronization works!
Delete cloud files via Windows Task Scheduler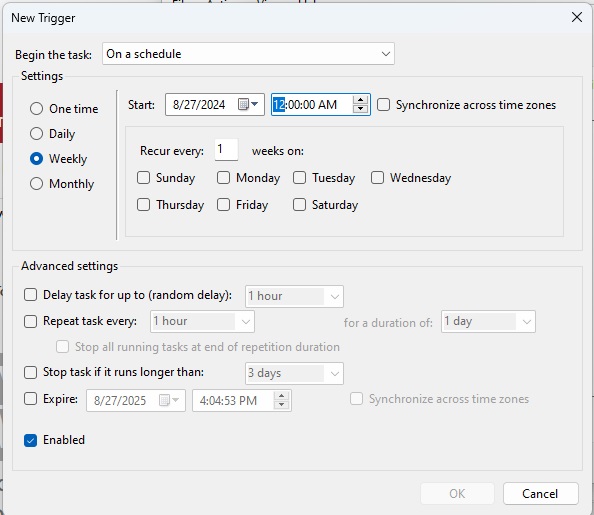
Use Windows Task Scheduler to define a schedule according to which the cloud folders are automatically and regularly deleted.
Use Windows Task Scheduler to define a schedule according to which the cloud folders are automatically and regularly deleted.
Foundry
Use Windows Task Scheduler to define a schedule according to which the cloud folders are automatically and regularly deleted.
Foundry
Foundry
It doesn’t matter whether the files are stored in OneDrive, Google Drive, or elsewhere in the cloud — you can use Windows Task Scheduler to delete cloud files automatically.
The prerequisite is that the cloud service creates a synchronization folder via an app in Windows Explorer. Otherwise, a tool like Raidrive can help — it integrates many services as drive letters.
To schedule tasks, you first need a batch file with the delete command. Open the Windows editor and enter the command
del /q /s D:\OneDrive\Photos*Replace D:\OneDrive\Photos with the path to the sync folder of your cloud storage. Save this file under any name, for example as clouddelete.bat, in any folder such as C:\Temp with the extension .bat.
To call up the task scheduler, type task or taskschd in the search field of the taskbar and click on the displayed hit. Select “Task scheduler (local)” on the left-hand side and click on Action > Create task.
Give the task a name and activate “Run whether user is logged on or not.” Accept all other settings in this window.
However, do not click on “OK” now, but switch to the “Trigger” tab. Here, click on “New,” leave the default setting “On a schedule” and select under “Settings” how often the deletion action should be carried out.
Then define a start time for the task under “Start,” confirm with “OK” and continue to the “Actions” tab in the previous “Create task” window.
Click on “New,” accept the default setting “Start program” and enter the command C:\Windows\SysWOW64\cmd.exe under “Program/Script” and — if you have used our example — the command “Add arguments (optional)”
/c „C:\Temp\clouddelet.bat“After clicking on “OK,” the task scheduler asks once again whether everything is correct. Answer the question with “Yes” and close the window with “OK.” The new task now appears in the “Task scheduling library” and is automatically executed according to the schedule.
Synchronizing with Free File Sync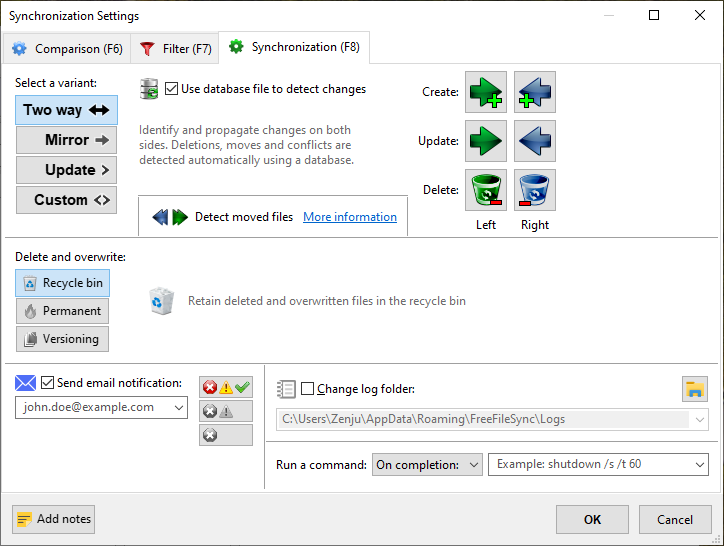
Files in Free File Sync offer to move the source folder in its configuration settings under “Versioning,” but it is actually a copy action.
Files in Free File Sync offer to move the source folder in its configuration settings under “Versioning,” but it is actually a copy action.
Free File Sync
Files in Free File Sync offer to move the source folder in its configuration settings under “Versioning,” but it is actually a copy action.
Free File Sync
Free File Sync
You can also use the open source software FreeFileSync to automatically move files of certain types from one folder to another according to a schedule.
However, the name of this process in the software is not quite correct. This is because the files are not actually moved, but copied: The source files are therefore retained. This also applies if you select “Versioning” in the “Synchronization settings.”
So if you select FreeFileSync to transfer the photos from your cloud storage to your local hard drive, you will also need a program to delete the original files afterwards.
Clean up cloud storage with the freeware Eraser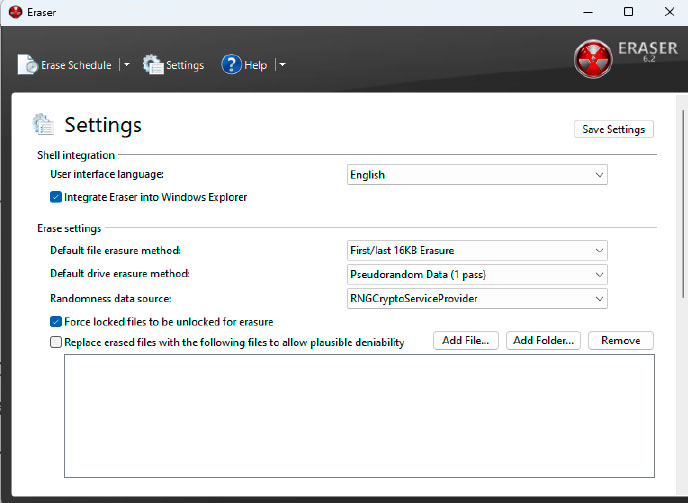
In the “Settings” of Eraser, it is best to set a simple method for the deletion processes for the cloud storage.
In the “Settings” of Eraser, it is best to set a simple method for the deletion processes for the cloud storage.
IDG
In the “Settings” of Eraser, it is best to set a simple method for the deletion processes for the cloud storage.
IDG
IDG
Alternatively, you can remove folders automatically with Eraser. The program is actually designed to permanently delete empty hard drive areas so that the data can no longer be restored. However, thanks to an in-app task scheduler, it is also suitable for regular deletion processes in your cloud storage.
After starting the program, first go to “Settings.” Change the default settings for the erasure method: Set the simple and fast “First/last 16KB Erasure” as the “Default file erasure method.” Then apply the settings by clicking on “Save Settings.”
Click on the downward-pointing arrow next to “Erase Schedule” at the top of the toolbar and then on “New Task.” Give the task a name of your choice and tick “Recurring” underneath. Click on “Add Data” and change the setting next to “Target type” to “Files in Folder” in the next window.
Now click on “Browse” next to the input field under “Settings” and find the cloud folder that is to be cleaned up regularly — Raidrive with a drive may also help here. In Eraser, remove the tick next to “Delete folder if empty” so that the folder structure remains untouched. Close the window with “OK” and switch to the “Schedule” tab.
Set a time and specify how often and on which days Eraser should carry out the deletion process. After clicking on “OK,” the configuration is complete and the program is ready to use. Eraser enters itself into the Windows autostart folder so that it is automatically activated when the operating system boots up.