A comprehensive guide to Flux NF4 in Stable Diffusion

Do you want to use Flux NF4 directly in Stable Diffusion and not the ComfyUI interface? This is the guide for those tweaks. Stable Diffusion has become a popular tool for creating AI-generated images with exceptional precision.
In this guide, we will explore Stable Diffusion, how to install and use it, and explore the features of Flux NF4, a powerful extension that extends its capabilities. We will also cover how to install Flux NF4 in Stable Diffusion and make the best use of it for your image diffusion tasks.
 Flux NF4 integration with Stable Diffusion offers a powerful enhancement to your image generation workflow (Image credit)
How to use Flux NF4 in Stable Diffusion
Flux NF4 integration with Stable Diffusion offers a powerful enhancement to your image generation workflow. Before diving into the specifics, it’s important to understand that Flux NF4 utilizes low-bit precision techniques to optimize performance, especially on systems with limited GPU memory.
This guide will walk you through the process of setting up and using Flux NF4 within Stable Diffusion, enabling you to create high-quality images more efficiently. Whether you’re a seasoned AI artist or just starting, mastering Flux NF4 can improve your image generation capabilities.
Grok image generation is the best deal in the AI market, and here’s why
What is Stable Diffusion?Stable Diffusion is a deep-learning model that generates high-quality images based on text prompts. It’s part of the family of generative models, like GANs (Generative Adversarial Networks), but stands out due to its ability to produce detailed and diverse images with less computational power.
 (Image credit)
Installation and setup
Before you can start using Stable Diffusion, you’ll need to install it on your system. Here’s a step-by-step guide:
- Install Python: Ensure Python 3.8 or higher is installed on your system. You can download it from the official Python website.
- Set up a virtual environment: It’s recommended to create a virtual environment to avoid conflicts with other Python packages.
python3 -m venv sd-env
source sd-env/bin/activate
- Install required packages: You’ll need to install PyTorch and other dependencies.
pip install torch torchvision torchaudio
pip install diffusers transformers
- Download Stable Diffusion: Clone the Stable Diffusion repository and set it up.
git clone https://github.com/CompVis/stable-diffusion
cd stable-diffusion
pip install -e .
- Download pre-trained models: You’ll need to download the pre-trained models used by Stable Diffusion. These can be found in various repositories or through community contributions.
 Flux NF4 integrates with BitsandBytes (BnB), a low-bit accelerator commonly used in large language models like LLaMA and Phi (Image credit)
Running Stable Diffusion
Once installed, you can generate images by running the following command:
python scripts/txt2img.py –prompt “A futuristic cityscape at sunset” –plms –n_samples 1 –n_iter 1 –scale 7.5 –ddim_steps 50
This command generates a single image based on the provided prompt. You can adjust parameters like `–scale` and `–ddim_steps` to control the output’s quality and style.
 BnB reduces the bit-width of computations, allowing for faster processing and lower memory usage (Image credit: GitHub/lllyasviel)
What is Flux NF4?
Flux NF4 is an advanced extension for Stable Diffusion that leverages low-bit accelerators to enhance image diffusion processes. It’s particularly useful for users with limited GPU memory or those seeking faster image generation without sacrificing quality.
Understanding BitsandBytes (BnB)Flux NF4 integrates with BitsandBytes (BnB), a low-bit accelerator commonly used in large language models like LLaMA and Phi. BnB reduces the bit-width of computations, allowing for faster processing and lower memory usage. In the context of image diffusion, this means quicker generation times and the ability to handle more complex models on less powerful hardware.
Supported Flux checkpointsFlux supports different checkpoints depending on your hardware configuration:
- Flux NF4 checkpoints: These are optimized for speed and efficiency, especially on GPUs with 6GB to 16GB VRAM.
- Flux FP8 checkpoints: These are designed for devices that do not support NF4, like older GPUs.
For most users, the recommended checkpoint is `flux1-dev-bnb-nf4-v2.safetensors`, which offers the best performance across various devices.
Flux Schnell NF4 V2 Released
byu/DenkingYoutube inStableDiffusion
Now that you understand what Flux is, let’s go through the installation process:
- Download the Flux checkpoint: Depending on your device’s capabilities, download either the Flux NF4 or Flux FP8 checkpoint. The recommended option for most users is `flux1-dev-bnb-nf4-v2.safetensors`.
- Place the checkpoint: Move the downloaded checkpoint file to the appropriate directory in your Stable Diffusion installation, typically under `models/ldm/stable-diffusion-v1/`.
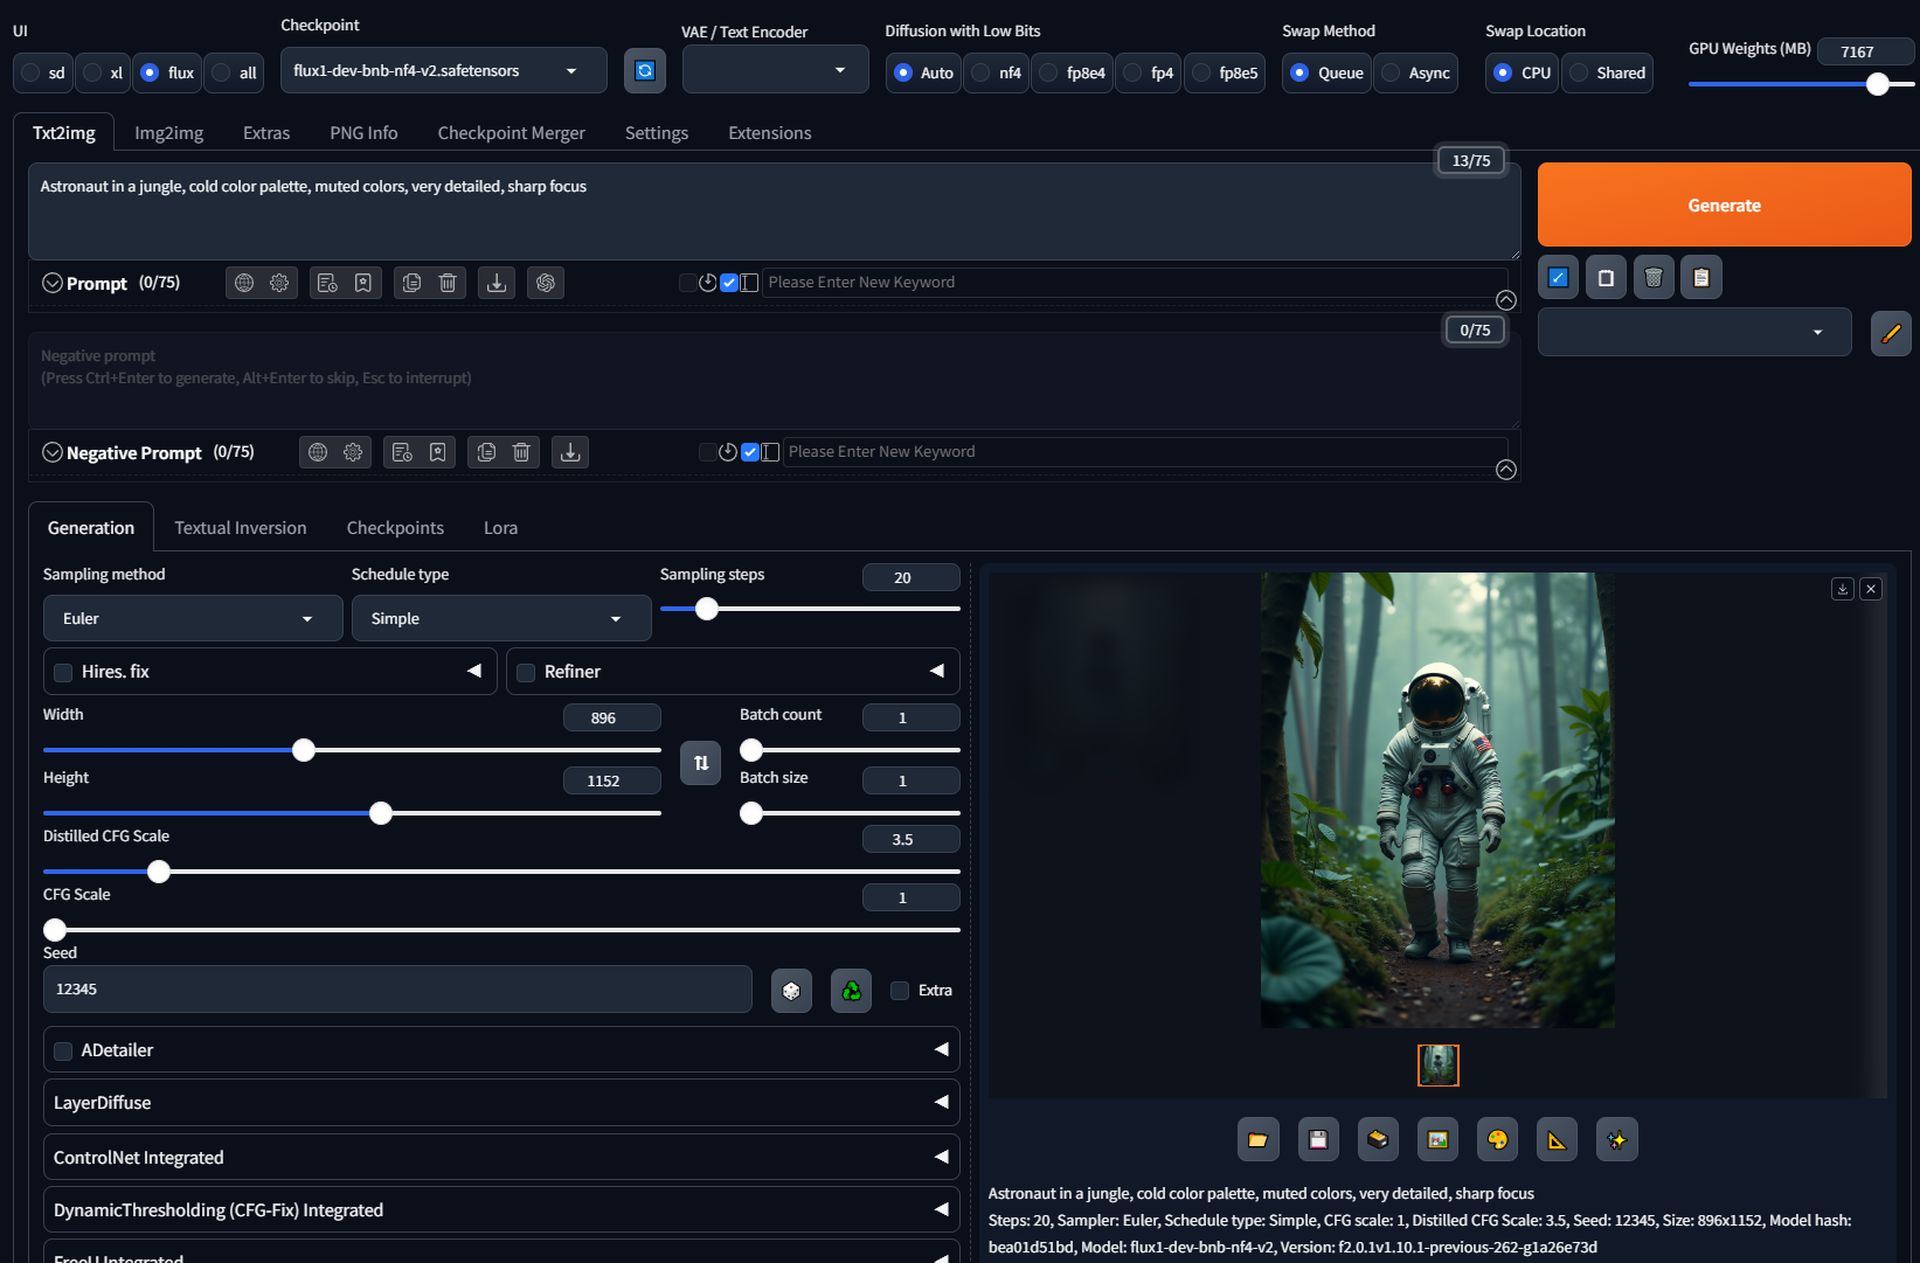
- Configure the UI: If you’re using a GUI like Forge, make sure to select the correct precision (NF4 or FP8) in the settings. Forge allows you to force the loading of a specific weight type or leave it on auto to use the default precision for your checkpoint.
 Using Flux NF4 with Stable Diffusion can enhance your rendering capabilities, especially if you are working with limited hardware (Image credit: Furkan Demirkaya made it using Flux)
Using Flux NF4 in Stable Diffusion
With Flux installed, you can now take advantage of its speed and efficiency. Here’s how to use it:
- Set up your prompt: Prepare your text prompt as usual. For example:
python scripts/txt2img.py –prompt “Astronaut in a jungle, cold color palette, muted colors, very detailed, sharp focus” –plms –n_samples 1 –n_iter 1 –scale 7.5 –ddim_steps 50 –ckpt flux1-dev-bnb-nf4-v2.safetensors
- Optimize performance: Depending on your GPU’s VRAM, you may need to adjust the UI settings:
- GPU weights: Larger values result in faster processing but may cause issues if too large.
- Swap method: Choose between `Queue` and `ASYNC`. The latter is generally faster but may cause stability issues on some devices.
- Monitor results: Run the command and observe the output. If you notice any issues with speed or quality, try adjusting the swap location (CPU vs. Shared) or the memory settings.
Using Flux NF4 with Stable Diffusion can enhance your rendering capabilities, especially if you are working with limited hardware. By following the steps outlined above, you can install and configure Flux to take full advantage of its low bitrate acceleration and optimize your workflows for faster, more efficient image diffusion.
Featured image credit: Furkan Demirkaya made it using Flux
