20 obscure Windows features every student should know about
Windows PCs are incredibly powerful and flexible, and that’s true even before you install any apps. As it turns out, Windows itself is chock-full of useful features that few people actually know about.
If you’re a college student who wants to take your college laptop to the next level, here are several obscure Windows features that’ll help you whether you’re taking notes, researching projects, or otherwise.
Related: The best laptops for college students
Live captions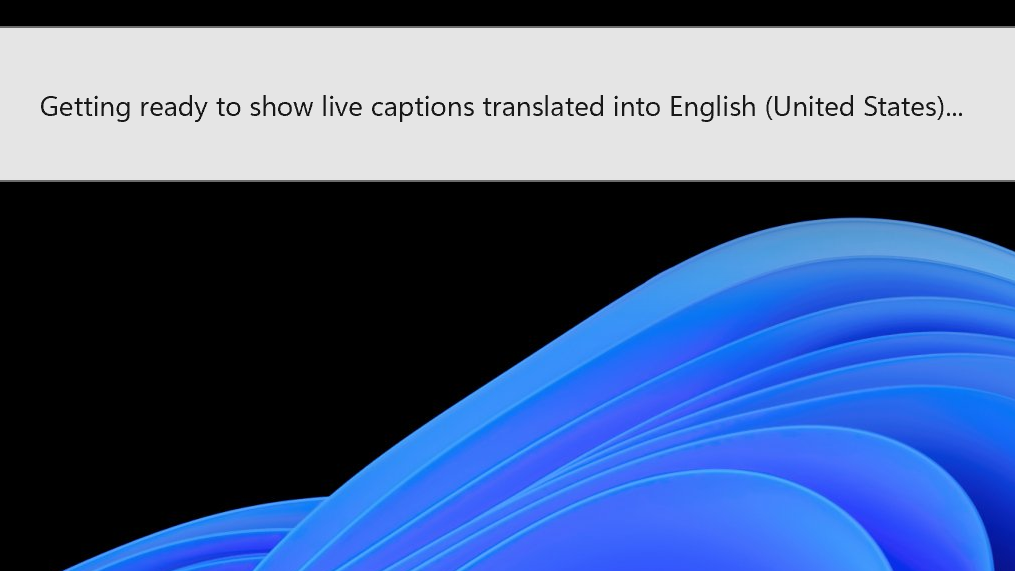

Chris Hoffman / IDG

Chris Hoffman / IDG
Chris Hoffman / IDG
Windows 11 has a feature called Live Captions that listens to audio and automatically generates readable captions on the fly.
It works when you’re watching a video, but it also works with audio captured by your microphone. So, whether you’re sitting in class during a lecture or watching a recorded video, Live Captions can use speech-to-text technology to transcribe what you hear into readable text.
To get started, just search for “live captions” in the Start menu and launch the Live Captions app. This app is available on all Windows 11 PCs and requires an internet connection to work.
If you have a Copilot+ PC, the Live captions feature can actually work offline and also supports live translation between different languages.
Clipboard history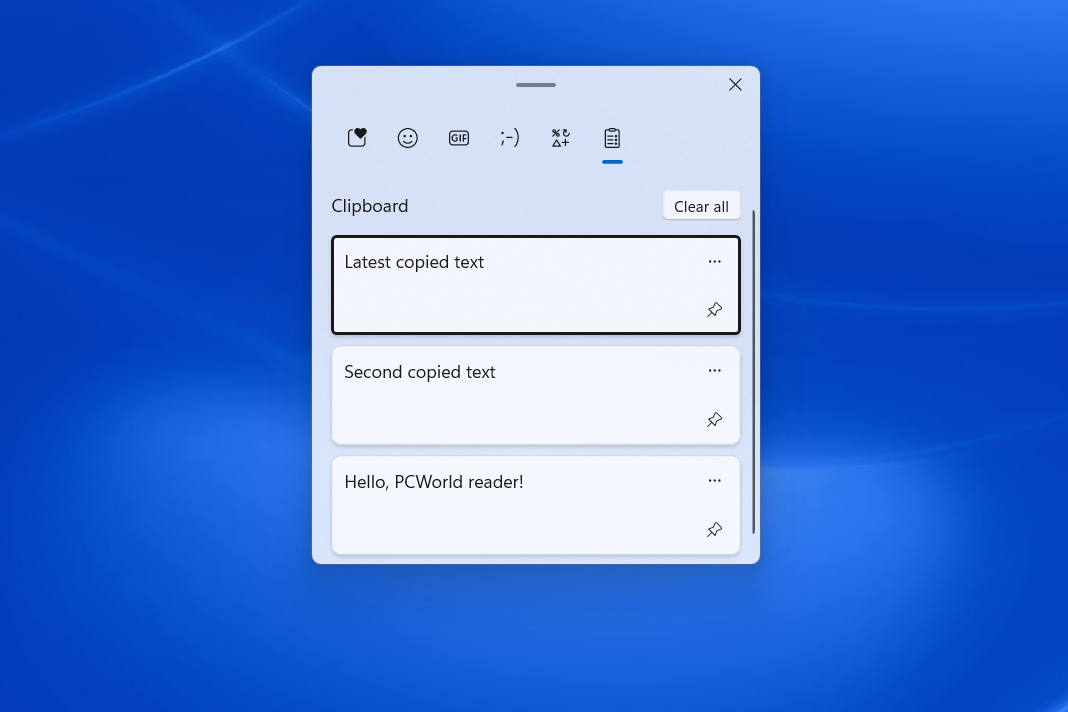
Joel Lee / IDG
Joel Lee / IDG
Joel Lee / IDG
Whenever you copy and paste, you might think you’ve overwritten the previous thing you copied — but that’s not true. Windows 11’s Clipboard History feature keeps track of all the text and images you copy.
Normally, when you paste, you just paste the last thing you copied. But you can choose from previously copied items by using the Windows key + V shortcut (rather than the usual Ctrl + V shortcut). You’ll be prompted to enable the Clipboard History feature if you haven’t already done so.
Clipboard History even allows you to “pin” items so that they’re always available and conveniently accessible for easy pasting in the future. It’s one of the many useful productivity features on Windows.
Handwriting to text inputAshkan Forouzani / Unsplash
Ashkan Forouzani / Unsplash
Ashkan Forouzani / Unsplash
Some Windows laptops ship with support for capacitive pens. These pen-enabled PCs are a great choice for college students because they make it way easier to write handwritten notes, mathematical equations, diagrams, and more in excellent note-taking apps like OneNote.
But with Windows 11, pen input works in any app thanks to handwriting recognition. You can write directly on any text field with your pen and Windows will instantly convert it to text.
Dictation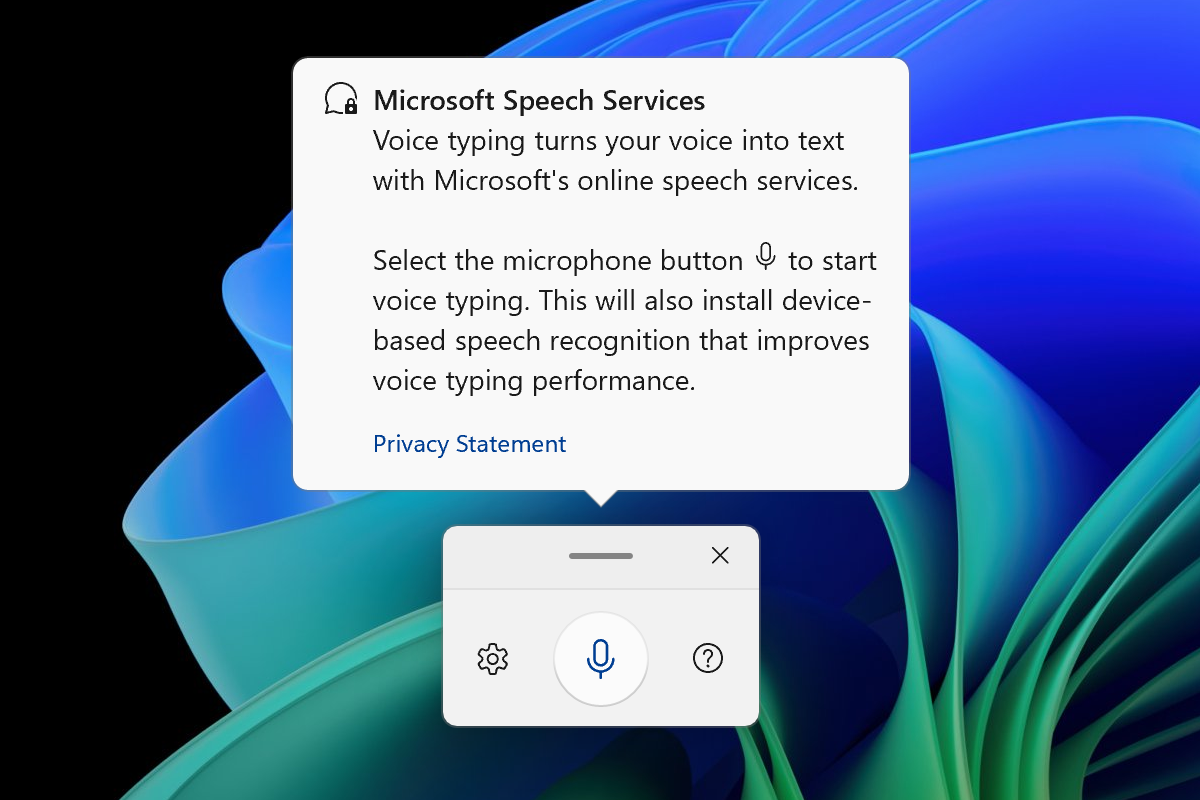
Chris Hoffman / IDG
Chris Hoffman / IDG
Chris Hoffman / IDG
Windows 11 has built-in support for dictation, which means you can speak your thoughts aloud and they’ll be transcribed on the fly as text. In other words, you can type using your voice — just like on a phone.
To open the Windows 11 dictation tool, use the Windows key + H shortcut. If you’re using a PC with a touch screen, you can also tap the microphone button on the touch keyboard to launch it.
Related: I used Windows Dictation to write this article with my voice
Web apps as desktop apps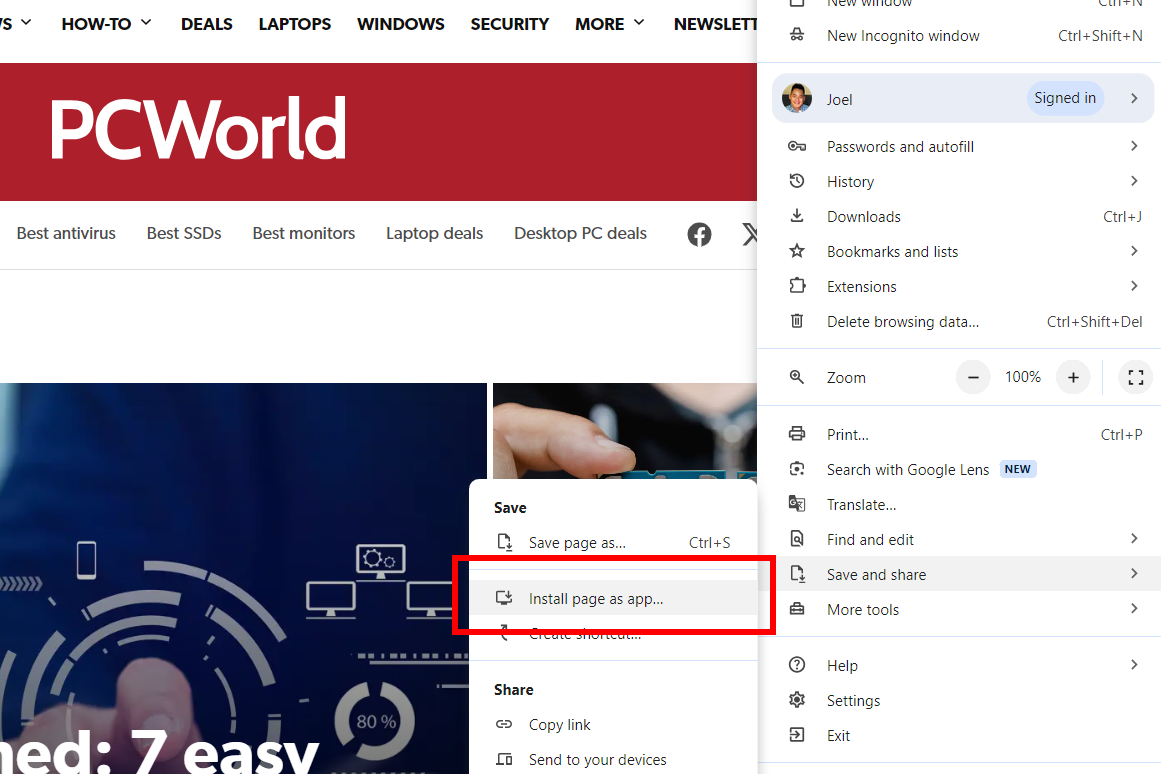
Joel Lee / IDG
Joel Lee / IDG
Joel Lee / IDG
These days, many apps are actually just websites that run in the browser. Hate having to keep dozens of tabs open with all of the webpages and web apps you use? Well, there’s a better way.
Windows 11 lets you turn webpages and web apps into Windows “apps” with their own taskbar icons and windows. They feel almost identical to usual desktop apps, and it’s a particularly convenient trick for single-page web apps you keep open 24/7 (e.g., Gmail, Spotify, Slack).
To do this in Google Chrome, navigate to any website and click the three-dot menu > Save and Share > Install page as app. In Microsoft Edge, navigate to a website and click three-dot menu > Apps > Install this site as an app. (Mozilla Firefox doesn’t offer this feature.)
Sticky notes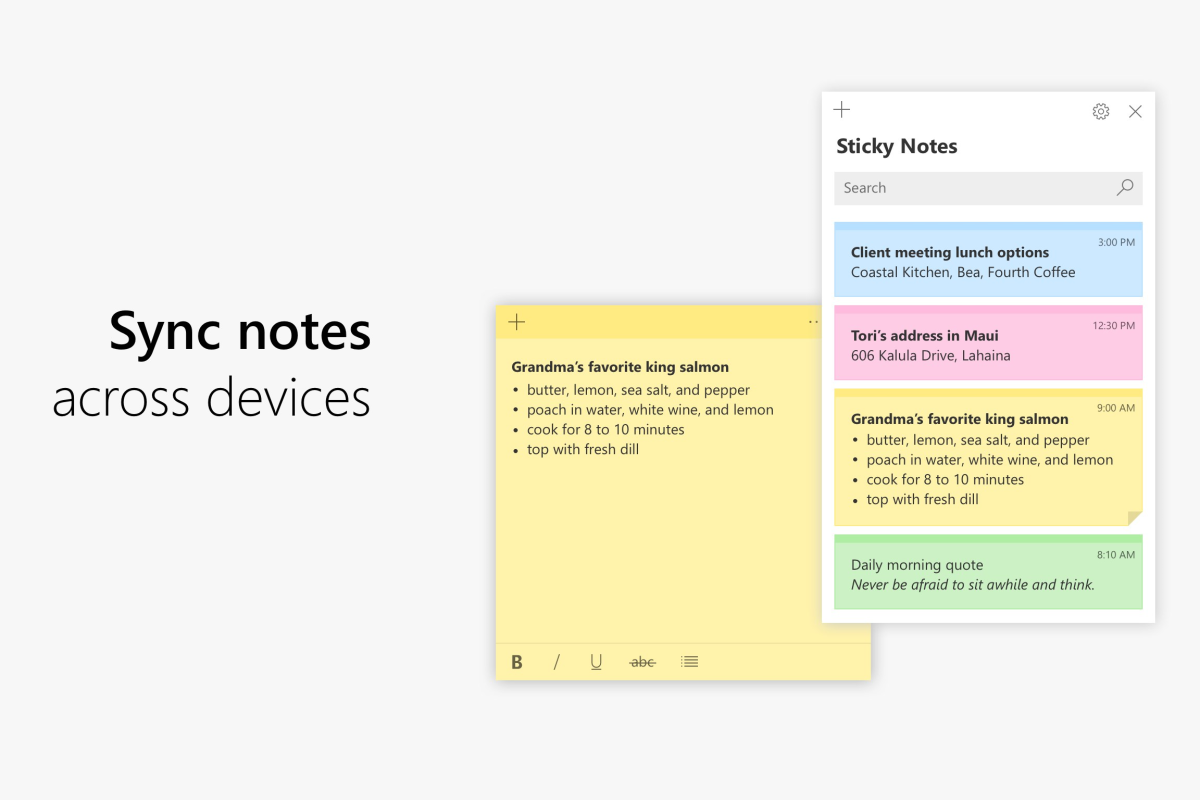
Microsoft
Microsoft
Microsoft
Microsoft OneNote is a great note-taking application, but it might be a little too complex for your needs. If all you want to do is jot down quick notes here and there, try the Sticky Notes app instead.
Windows 11 has a built-in Sticky Notes app that you can launch by searching for “sticky notes” in the Start menu. This app can keep notes pinned to the desktop or kept in a simpler list format, and the notes can be synced between your PC and other devices.
When syncing Sticky Notes with your phone, your notes are accessible via OneNote Mobile, Microsoft Launcher for Android, and Outlook for Windows.
Emoji menu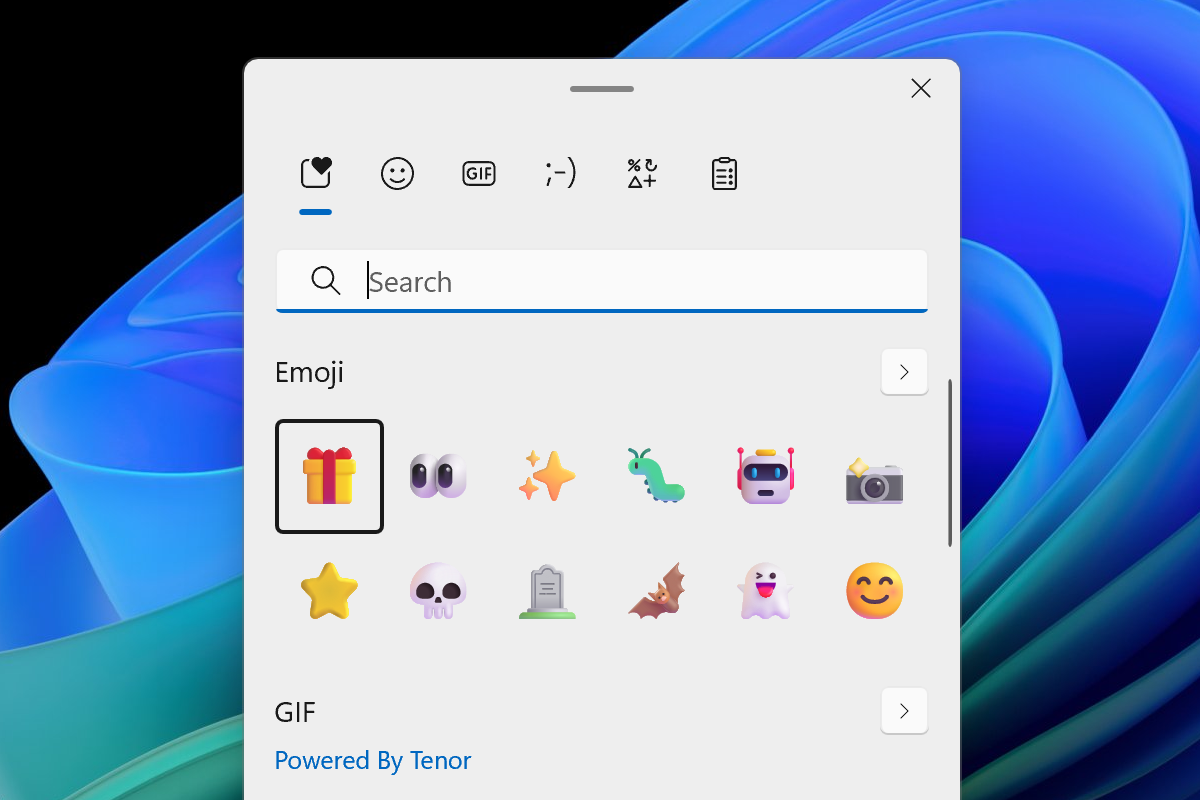
Chris Hoffman / IDG
Chris Hoffman / IDG
Chris Hoffman / IDG
Windows has a convenient built-in quick insertion tool for emojis. To access it, you can use either the Windows key + Period or Windows key + Semicolon keyboard shortcuts.
You can browse all the emojis included with Windows and insert them into any application or document. You can also start typing right after pressing the keyboard shortcut to search for a particular emoji.
Text editing shortcuts 76 / Unsplash
76 / Unsplash
76 / Unsplash
76 / Unsplash
76 / Unsplash
The Ctrl key provides so many essential keyboard shortcut tricks for editing text. My favorite part, though, is that it makes many keyboard actions apply to entire words instead of individual characters.
Here’s what that means: Normally, when you press Backspace, you delete the a single character of text. But if you use the Ctrl + Backspace keyboard shortcut, you delete the entire previous word. This works with lots of shortcuts, including the Delete key.
Another example is text selection. You can hold Shift and press the left or right arrows to select individual characters. But if you use the Ctrl + Shift + left or right arrow keyboard shortcut, you can select entire words at a time. And if you use Ctrl + Shift + Home or End, you can select entire lines of text with a single keystroke.
Dynamic locking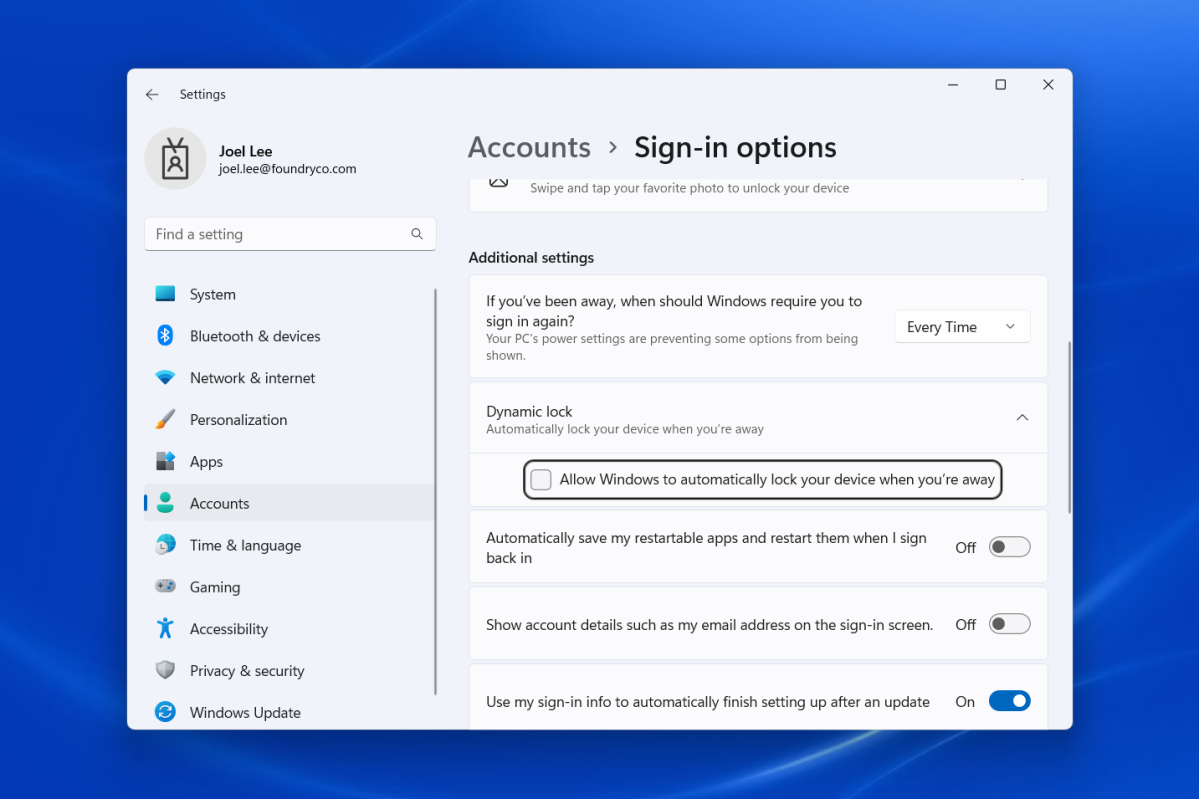
Joel Lee / IDG
Joel Lee / IDG
Joel Lee / IDG
Whether you’re on a laptop or PC, you should be locking it whenever you aren’t using it, especially when you’re on campus. You’re probably already doing it with a keystroke (Windows key + L) or with a setting that automatically locks whenever your system goes to sleep.
But there’s a better way in Windows 11: use the Dynamic Lock feature, which detects when your phone moves away from your computer and automatically locks when it does. You can set this up in Settings > Accounts > Sign-in options > Dynamic lock.
Presence-based locking Ernest Ojeh / Unsplash
Ernest Ojeh / Unsplash
Ernest Ojeh / Unsplash
Ernest Ojeh / Unsplash
Ernest Ojeh / Unsplash
Newer laptops with Presence Sensors don’t even need to involve your phone. They can detect when you move away from your computer, then automatically lock when you do — and they can automatically unlock when you sit back down. If you’ve set up Windows Hello with facial recognition, they can even sign you back in automatically.
Further reading: The best webcams for Windows Hello
Focus timers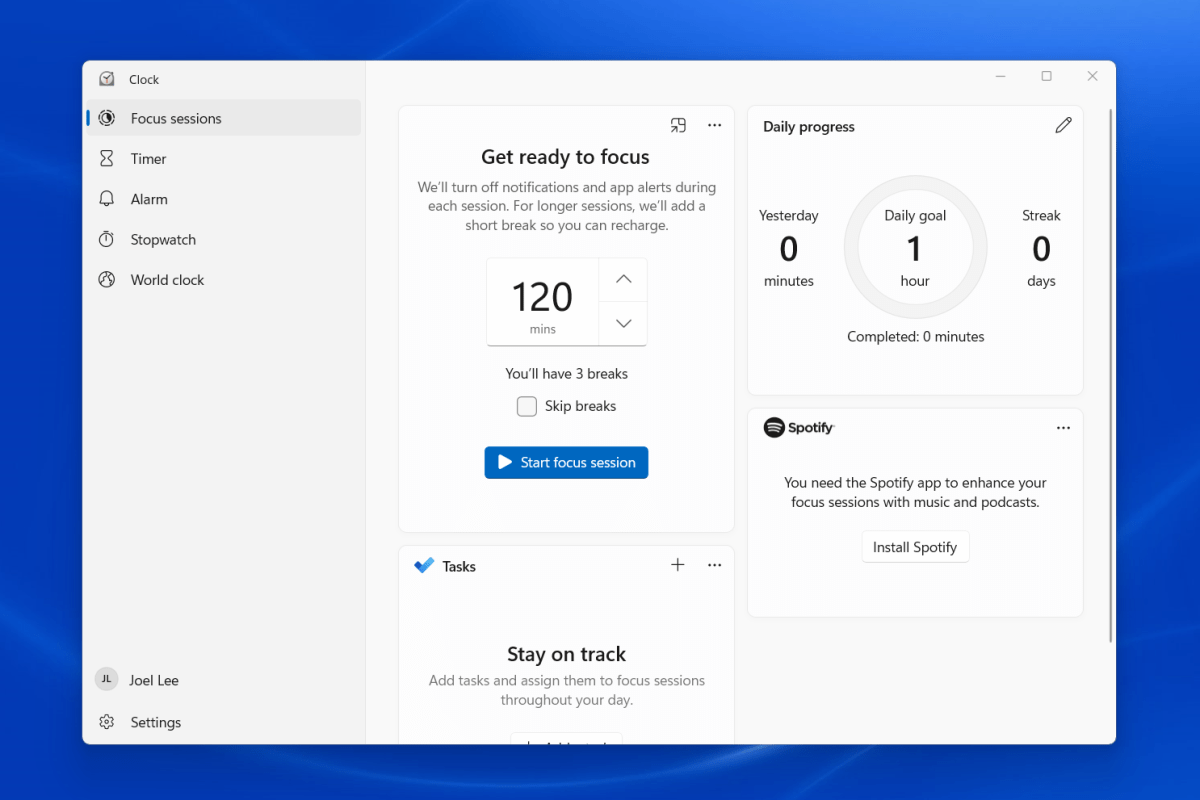
Joel Lee / IDG
Joel Lee / IDG
Joel Lee / IDG
Have you heard of the Pomodoro technique? It’s a method that helps you stay focused and get more done in less time. The key is to work in half-hour bursts with short breaks in between — and most people use timers to know when to switch between work and breaks.
Windows 11 has a built-in Pomodoro timer. You can access it by opening the Clock app in the Start menu, then activating its Focus sessions feature. You can configure your focus session, during which all notifications and app alerts will be stifled. You can also link your Spotify account so the right music plays while you’re focusing.
Do Not Disturb mode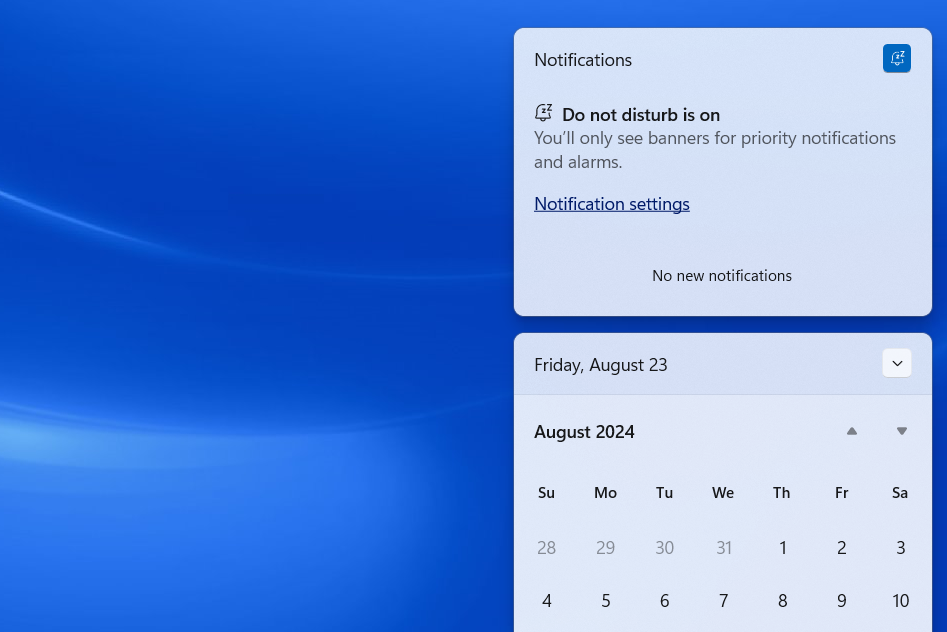
Joel Lee / IDG
Joel Lee / IDG
Joel Lee / IDG
Windows has a Do Not Disturb feature that quiets down noisy notifications while you’re trying to focus. While Do Not Disturb has long been a popular feature on smartphones, Windows PCs didn’t actually have this sort of thing for many years.
To enable Do Not Disturb mode on Windows 11, press Windows key + N to open the Notification Center, then click the bell icon with Z’s at the top-right corner. On Windows 10, you’ll need to activate a setting called Focus Assist to temporarily disable notifications.
Sync with your phone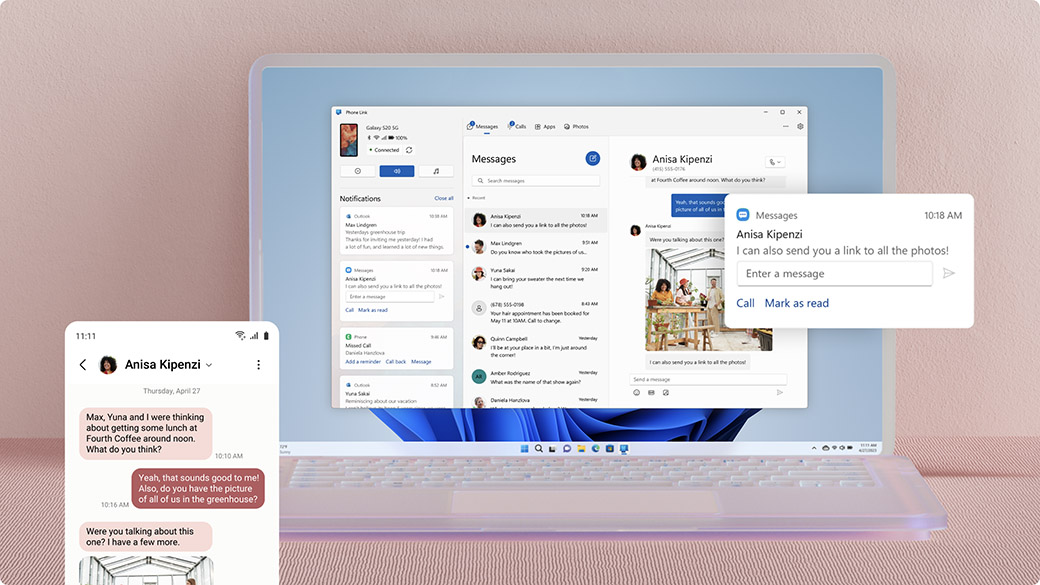
Microsoft
Microsoft
Microsoft
Windows makes it easy to access or control your phone right from your PC, but the process is different depending on whether you have an iPhone or Android phone (and each one’s functionality is different).
If you have an iPhone, install the iCloud for Windows app. After you set it up, you’ll be able to link iCloud Photos to the Photos app and browse from within Windows. You’ll also get to integrate with iCloud’s other features, including Drive, Passwords, Contacts, Calendar, and Bookmarks.
If you have an Android phone, open the Phone Link app from the Start menu. After you set it up, you’ll be able to text from your PC, manage your phone’s notifications, browse photos in your camera roll, and even copy-paste photos to your PC.
Screenshots and screen recording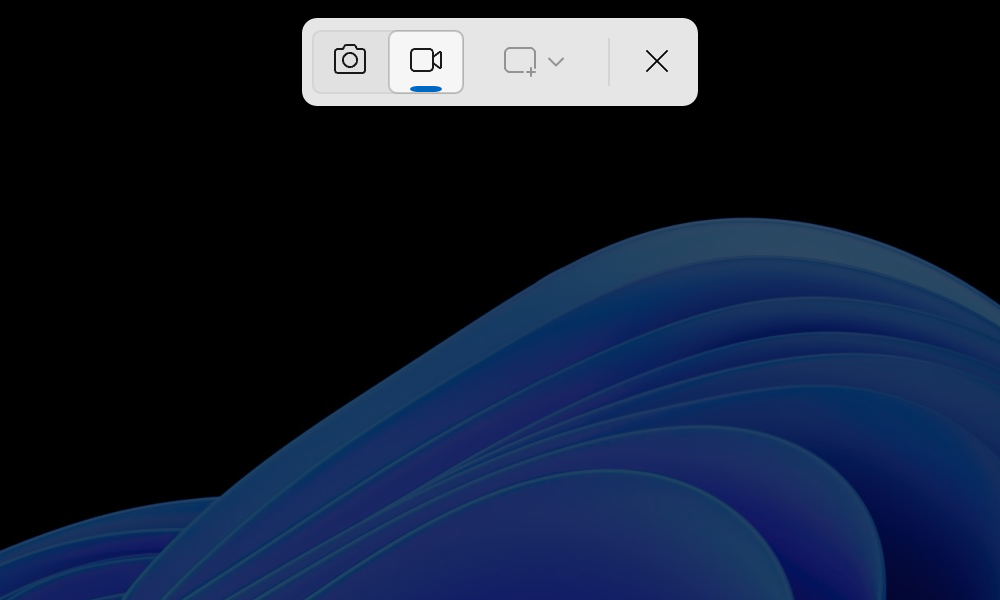
Chris Hoffman / IDG
Chris Hoffman / IDG
Chris Hoffman / IDG
Modern Windows PCs have powerful built-in screenshot tools. On Windows 11, it’s called the Snipping Tool, which is as easy to launch as pressing the Windows key + Shift + S keyboard shortcut (or the Print Screen key if you have that on your keyboard).
Once the Snipping Tool is opened, you’ll see an overlay bar at the top of your screen. Use it to select the type of screenshot you want: Rectangle, Window, Full screen, or Freeform. Then, click or drag to select what you want to capture and you’ll get a notification. (You can click the notification to edit the screenshot before saving it.)
Related: How to take smarter screenshots in Windows 11
The Snipping Tool also includes the ability to record video of your screen. Switch to the video camera icon in the overlay bar at the top of the screen, then draw a rectangle over the area you want to capture.
Past versions of files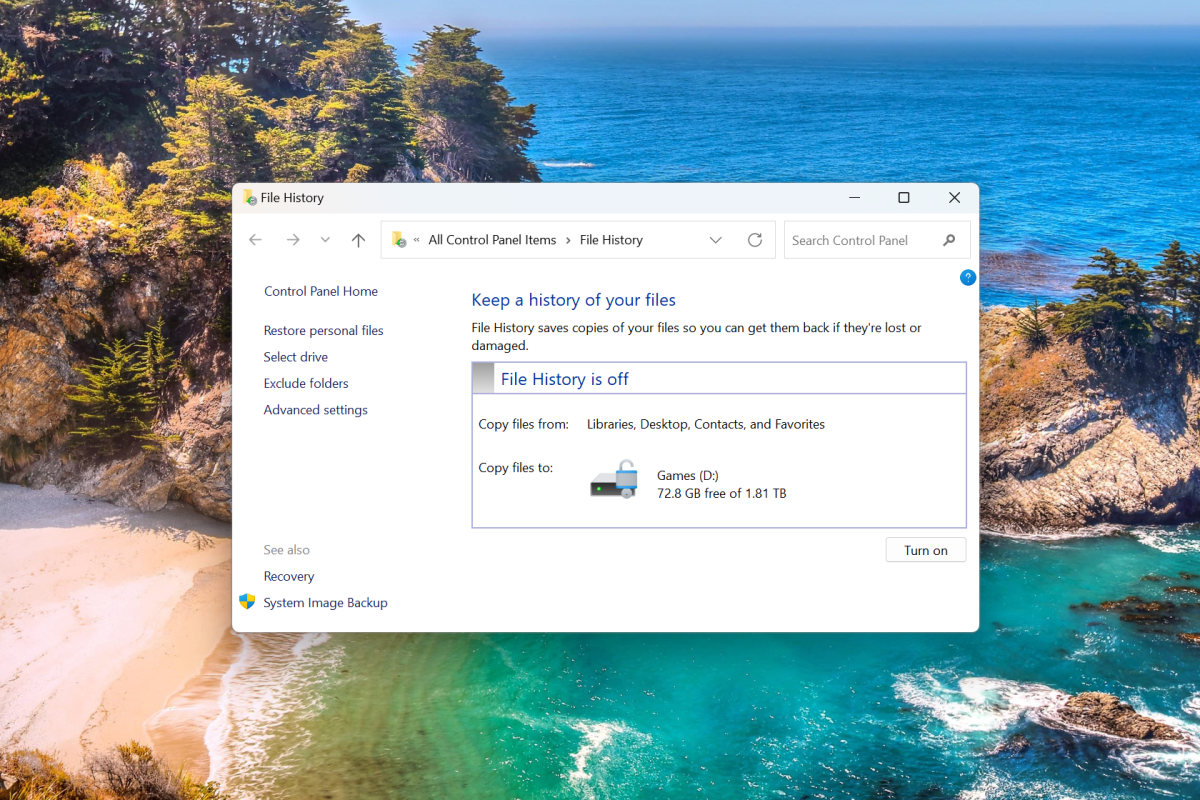
Chris Hoffman / IDG
Chris Hoffman / IDG
Chris Hoffman / IDG
Windows offers multiple ways to retrieve an older version of a file. If the file is synced to Microsoft’s OneDrive cloud storage, you can locate it in File Explorer, right-click it, and select OneDrive > Version history.
For files that are only stored on your PC and not synced to a cloud storage service, you can set up the File History feature to regularly back up selected files and folders to an external drive. Then, you can restore previous versions of the file from there.
Lost laptop tracking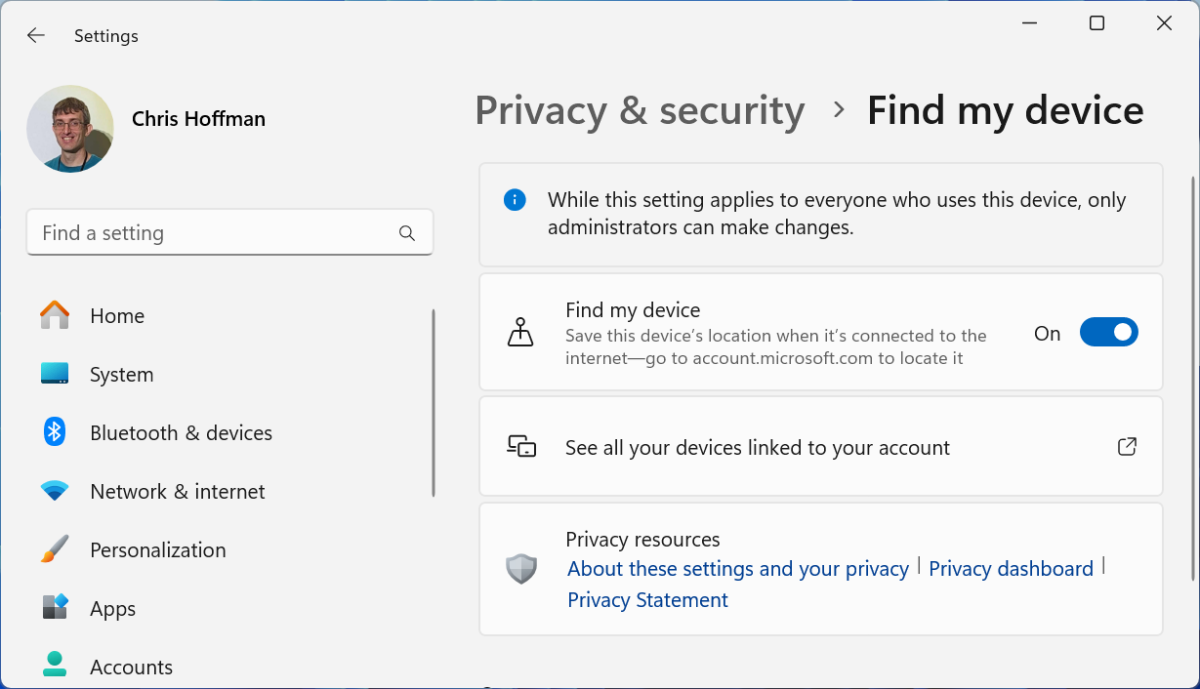
Chris Hoffman / IDG
Chris Hoffman / IDG
Chris Hoffman / IDG
If you’re at college and using a laptop, you should always have a contingency plan in case your laptop is lost or stolen.
One option is to use the built-in laptop tracking feature of Windows, which also lets you lock your laptop remotely. It won’t be as useful as similar features available on smartphones because your laptop probably doesn’t have a cellular connection. The tracking requires your laptop to be connected to Wi-Fi, and your laptop can’t be in sleep mode.
Even so, it’s still useful even if it isn’t perfect. If you lose your laptop on campus, it’ll probably stay connected to Wi-Fi and be traceable.
But the key is making sure the feature is active before you lose your laptop. Turn it on now by going to Settings > Privacy & security > Find my device and activate the Find my device option. Then, use Microsoft’s account devices page to track down your laptop.
Further reading: Laptop security guide for college students
Advanced calculators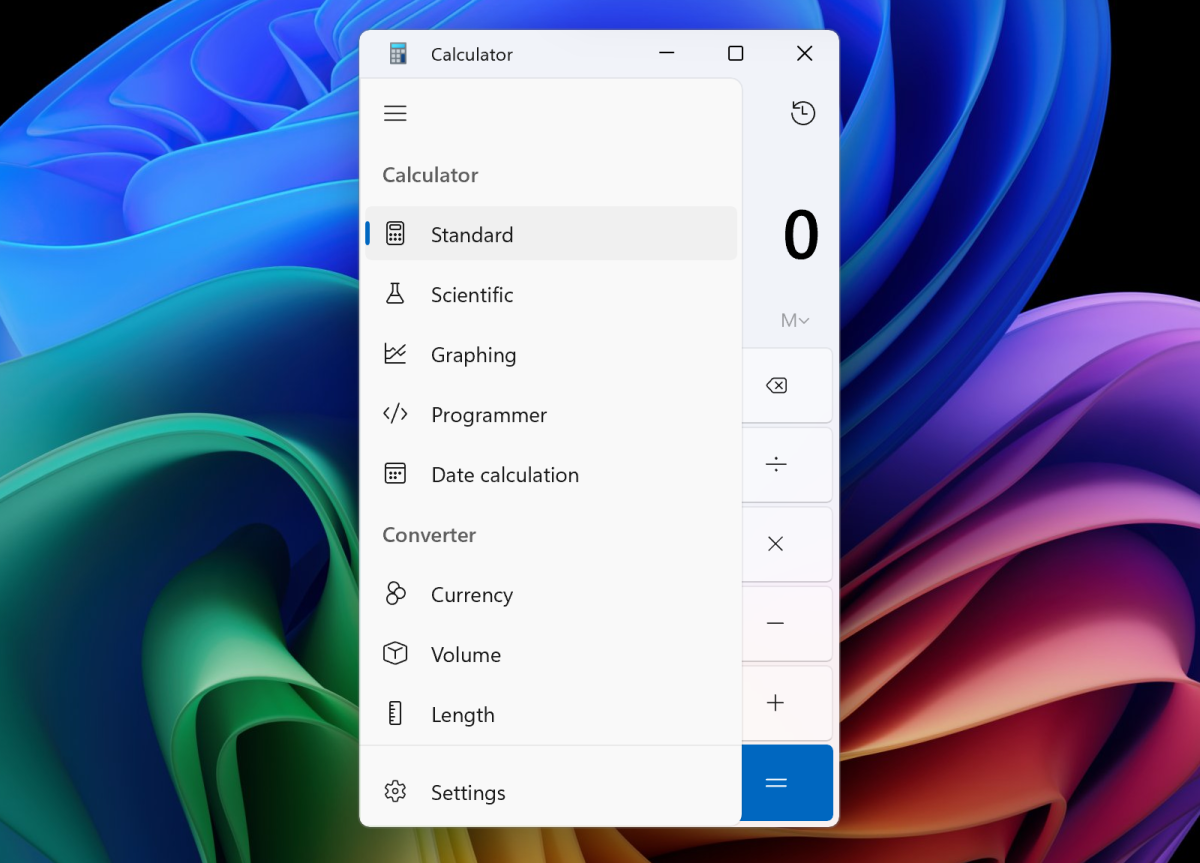
Chris Hoffman / IDG
Chris Hoffman / IDG
Chris Hoffman / IDG
The built-in Calculator app on Windows is more powerful than it looks. Open the app’s menu and you’ll find different calculator modes, including a scientific calculator, a graphing calculator, and tools for converting currencies and units of measurement.
Quick video trimming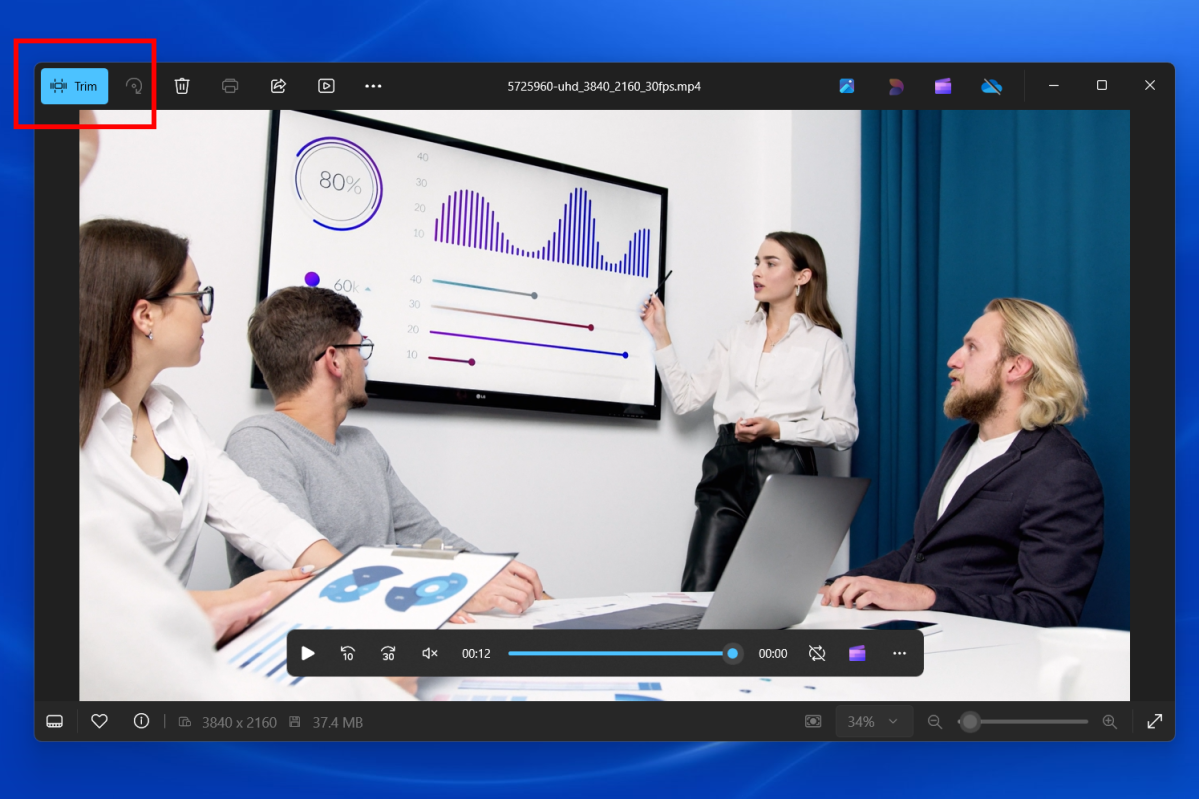
Joel Lee / IDG
Joel Lee / IDG
Joel Lee / IDG
Windows comes with Microsoft’s Clipchamp video editor, but there’s actually another useful video tool buried within the operating system. With this feature, you can quickly trim video files and clip sections to save as their own smaller video files.
You can do this by right-clicking on a video file in File Explorer, then selecting Open with > Photos. When the Photos app opens up with the video loaded, click the blue Trim button on the toolbar and select the part of the video you want to save.
Further reading: How to use the free Clipchamp video editor
Quick photo editing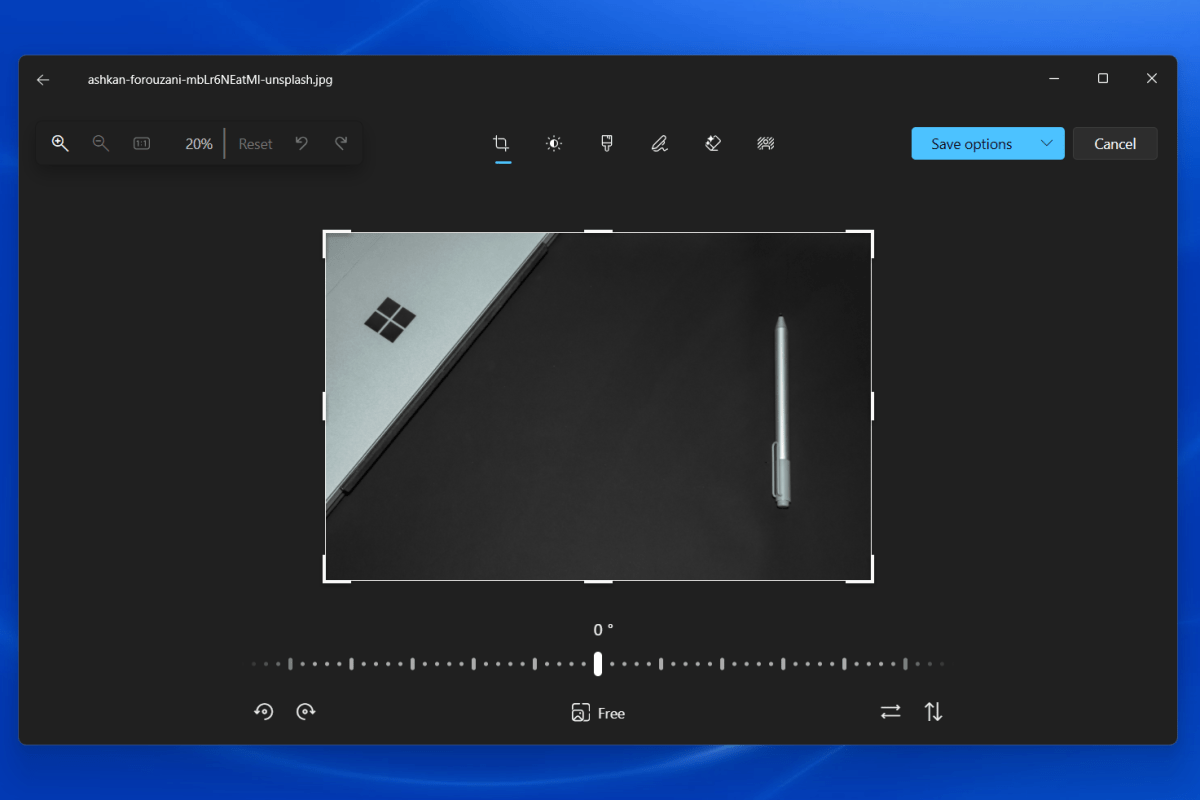
Joel Lee / IDG
Joel Lee / IDG
Joel Lee / IDG
You’d be surprised by how capable the built-in Photos app can be. It’s not just a photo viewer — it’s also a good photo editor when you’re in a pinch or just need some simple crops and edits.
After opening an image in Photos, click the blue Edit button in the toolbar to access the image editing tools. You’ll see options for cropping the image, marking it up, adjusting lighting, applying filters, and even using AI effects to erase elements and remove the background.
Laptop battery drain statistics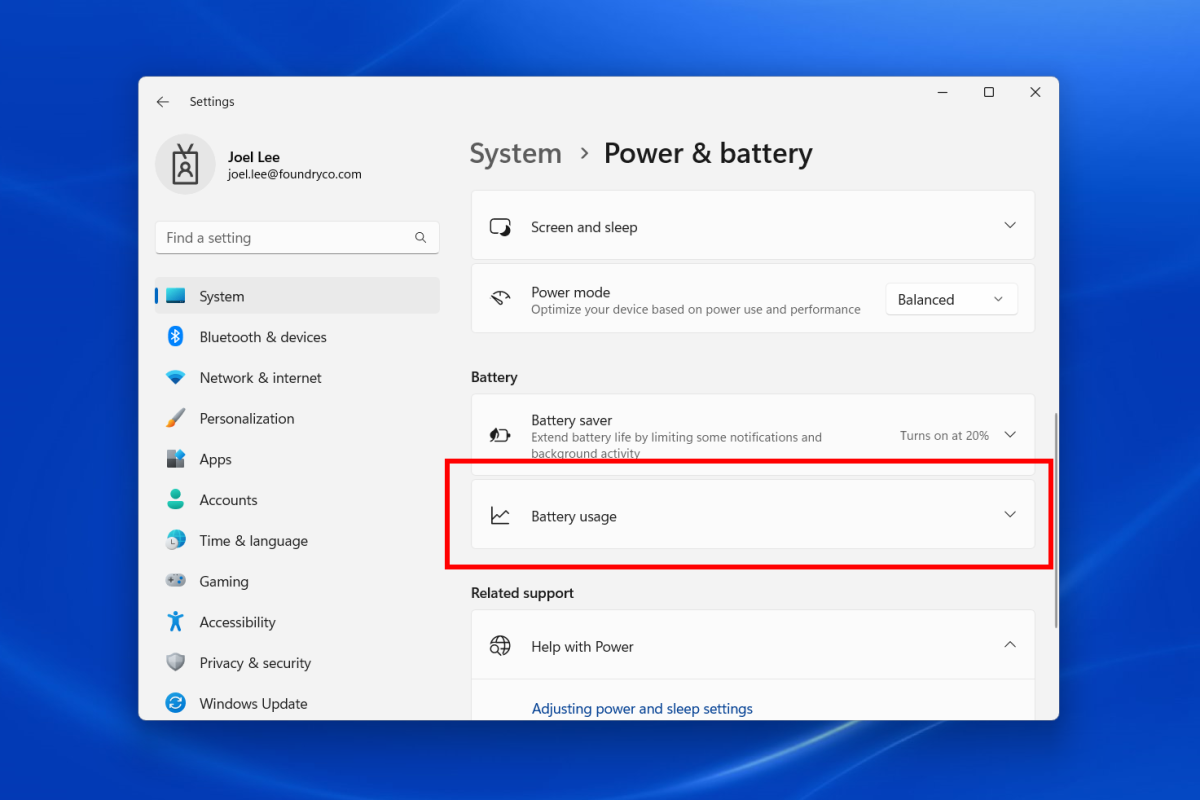
Joel Lee / IDG
Joel Lee / IDG
Joel Lee / IDG
Everyone always wants more laptop battery life. If you find your laptop dying much faster than you think it should, you’ll want to look into which apps are the biggest battery drains — and Windows keeps track of that for you, making it easy to investigate and troubleshoot.
On Windows 11, head over to Settings > System > Power & battery. Then, scroll down and expand the Battery usage section to view battery usage by app. On Windows 10, go to Settings > System > Battery to find these same details.
Once you know which apps are killing your battery life, you can make informed decisions on what to do. (Battery stress is one of the common mistakes killing your laptop’s lifespan.)
Further reading: Is it bad to always leave your laptop plugged in?